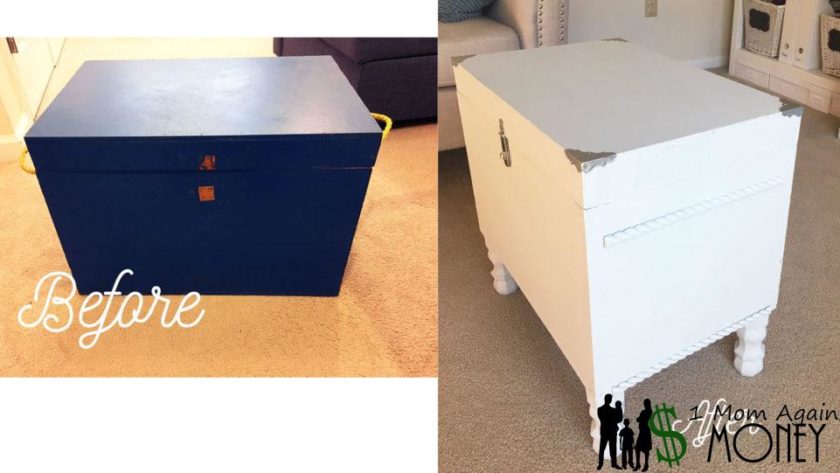
A friend asked me if I would be interested in a wooden trunk they had. It started out life as a trunk that a boy scout took with him camping, hence the blue.

It was in need of some updating and new hardware, but the actual wood was in good shape and the box and had been made well. It was also the perfect size for an idea I’d been sitting on for a little while.

I started by removing all the old hardware and the rope handles. Then I gave it a coat of primer all over, even the inside.

When the primer was dry, I started applying coats of Sherwin Williams Latex paint. I had some leftover from a previous project in the living room (where I wanted the trunk to eventually stay). The color is called Misty, it’s a white with a small hint of pale blue. While a coat was drying I headed to Home Depot for some new hardware and furniture legs.

I picked a traditional 6″ furniture leg because I liked the contrast of the curves with the very simple box.

They were around $3.50 each at Home Depot in the aisle with the crown molding.
I selected these hinges again because of the curves and it felt like they went with the legs.

They are by Everbilt and are called Decorative Broad Hinges. I found them in the specialty hardware section.
Right next to these hinges was this hasp (the picture makes it look more dull than it actually is). I loved the idea of having a latch on the trunk because it just made it feel more fun.

And finally I saw these decorative corners in the same area and immediately loved their shape, but they only came in brass everything else in the room is silver or brushed nickel. So I passed them up and thought I would look at some other hardware stores for something similar in silver, but I had zero luck and I couldn’t stop thinking about them, so I went back to Home Depot and bought them.

I painted the legs the same Misty color and then turned my attention to figuring out a way to make the corners silver.
I spray painted them with some primer that said it would stick to metal. Then I used a silver spray paint on them. After putting them on the trunk I sprayed some of the spray paint into a plastic yogurt cup and used a paint brush to paint the tops of the screws so they were silver too. It turned out great!
![]()

Finally I decided I didn’t want handles on it because it wasn’t really going to be something that I would be moving around, but I had big holes in the side of the trunk. So I found these decorative wood pieces at Michael’s, painted them and then used wood glue to adhere them to the trunk. After the glue dried I took small finish nails and nailed a couple into the decorative pieces from the inside of the trunk. It probably wasn’t super necessary because the glue worked really well, but I figure they aren’t going anywhere now. I used a little bit of paint to cover the nail heads.

The trunk is just the right size to sit at the end of our little loveseat. It is holding a blanket, a few seasonal pillow case covers for the pillows on the couch, and some supplies that I use for piano lessons along with a flute and a few other odds and ends. It’s been a great addition to the room! And I spent less than $25!